Download and Install Android, iOS SDK
(Xcode, mobile app development kit on windows)
Over 150,000 downloads of iBuildApp development kit: SDK for iOS and Android. Supporting xcode on windows
Supported platforms
-
System Requirements
- iOS
- Android
Installation and Configuration
- iOS SDK
- Android SDK
Downloading and Installing
- iOS iBuildApp SDK
- Android iBuildApp SDK
Configuring
- iOS iBuildApp SDK
- Android iBuildApp SDK
Your First iBuildApp Mobile App Feature
- iOS App Feature
- Android App Feature
Web Part Configurations
- Feature Fields Customization
Find Mobile Jobs
This is the place for developers to build, deploy, test and publish their own Extension Features (hereinafter 'Feature') for mobile applications with the iBuildApp platform.
The m123_myfirstapp.m and m123_myfirstapp.h files are entry point for your Feature. In the sample below those files implement View with necessary functions to set up its display and life cycle.
View contains ImageView with the image loaded from Feature's resource file (named in accordance with file naming convention) and WebView initiated by the host application using data loaded from the Feature's resource file (XML-formatted).
The host application parses the resource file and saves data using UserDefaults. The Extension Feature loads that data from UserDefaults and displays in WebView. This schema illustrates the possibility of transferring the data to the Extension Feature from outside.
You may implement any desired functionality, considering the following conventions:
- The starting View Controller of the Feature should comply with the naming convention (m123_myfirstappViewController)
- You can NOT use the RootViewController name into your code
- When uploading your Feature on iBuildApp.com website, you should also provide the full list of frameworks, static and dynamic libraries, and object files that are required for using your Feature.
- All resource files should be allocated into the userContent folder (see p. 3.2 and Fig. 2)
- All resource files related to the Feature should be named in accordance with the naming convetions (see p. 3.2)
Running your iBuildApp app feature
You may need to switch active Scheme & Destination for testing and debugging your Feature (see Fig. 6 and 7).
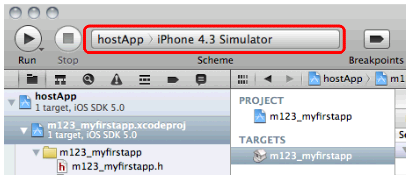
Fig. 6
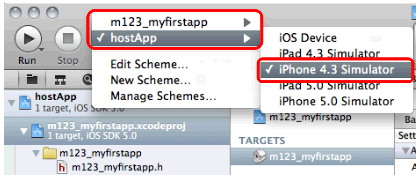
Fig. 7
The option displayed on Fig. 6 is suitable for most cases (Scheme: hostApp, Destination: iPhone 4.3 Simulator): a static library (Extension Feature) assembly, compilation and call from the host application.
To test your Feature, you should Build and Run your code - click on the appropriate button or select Product > Run from the Xcode menu:
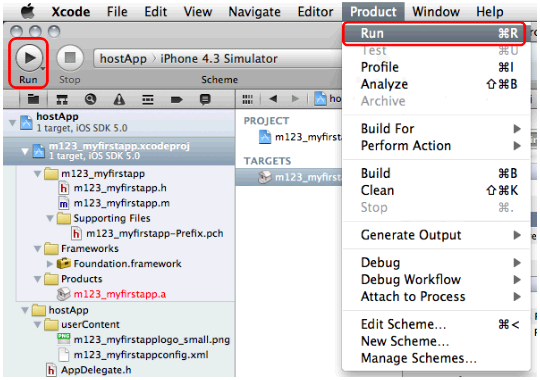
Fig. 8
When the Feature is created, it should be assembled into the final binary: set up the following values for active Scheme & Destination:
- Scheme: hostApp
- Destination: iOS Device
- Architectures: iphoneos (See Fig. 4 and 5).
Then perform the Clean (see Fig. 9) and Build for Archiving (Fig. 10). The blue marked area on the image below illustrates active Scheme & Destination for this task:
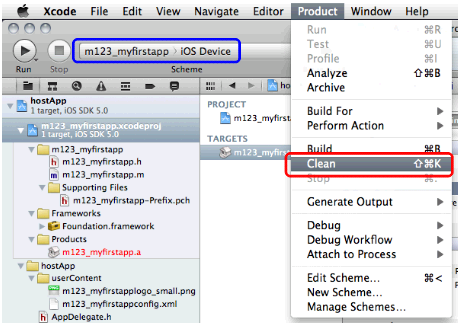
Fig. 9
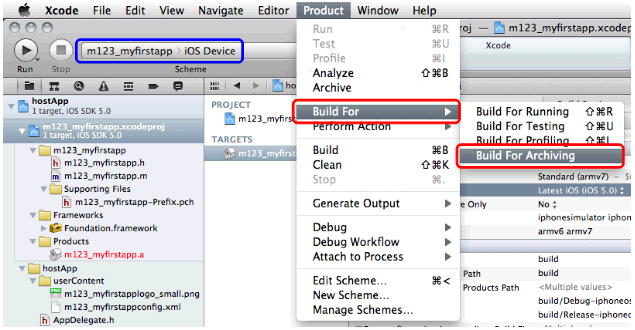
Fig. 10
Now your Feature is ready for uploading on iBuildApp.com server. Locate your project folder in the Finder window, select the userContent folder and compress it using corresponding option for their context-menu:
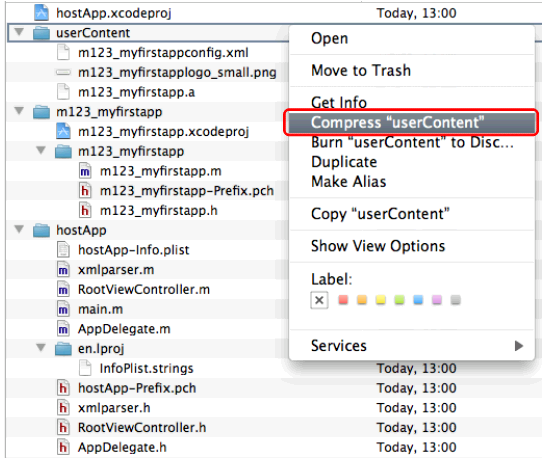
Fig. 11
You'll get the userContent.zip file - upload it on the iBuildApp.com server when publishing your Extension Feature.
Using your iBuildApp app feature
The M123.java file is entry point for your Feature. In the sample below this file implements Activity with necessary functions to set up its display and life cycle.
Activity contains ImageView with the image loaded from Feature's resource file (named in accordance with file naming convention) and WebView initiated by the host application using data loaded from the Feature's resource file (XML-formatted).
The host application parses the resource file and saves data using EntityParser.java. The Extension Feature loads that data from EntityParser.java and displays in WebView. This schema illustrates the possibility of transferring the data to the Extension Feature from the outside.
You may implement any desired functionality, considering the following conventions:
- The starting Activity of the Feature should comply with the naming convention (m123)
- All resource files should be allocated into the res folder (see p. 3.2 and Fig. 2)
- All resource files related to the Feature should be named in accordance with the naming conventions (see p. 3.2)
Running your iBuildApp app feature
Specify the link to the Feature (as a library) to test and debug your Feature (see Fig. 4 and Fig. 5):
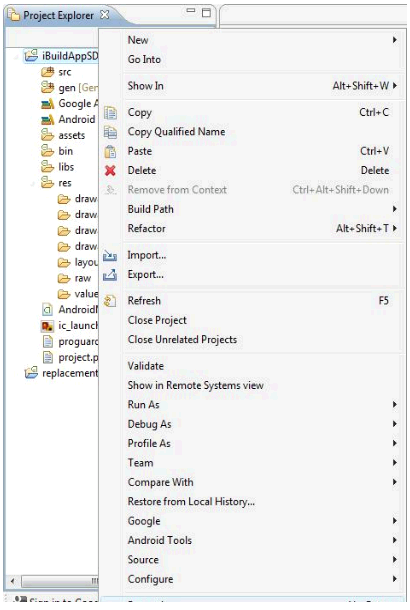
Fig. 4
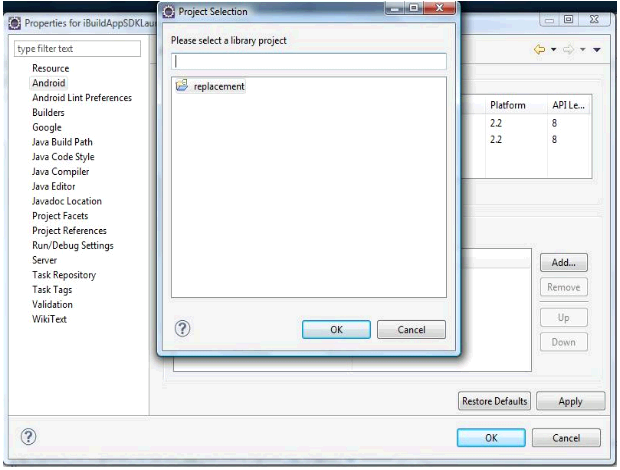
Fig. 5
To test your Feature, you should Build iBuildAppSDKLauncher and then Run it - click on the appropriate button or select Run As > Android Application from the Eclipse menu:
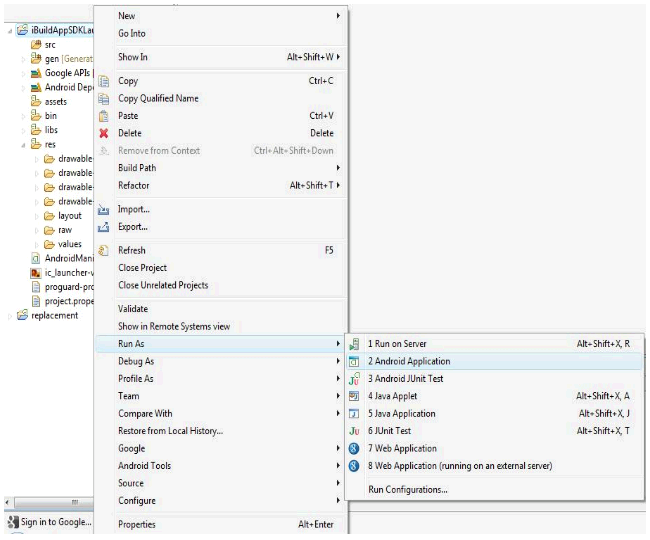
Fig. 6
Now your Feature is ready for uploading on the iBuildApp.com server. Locate your project folder in the file manager and compress it into ZIP archive.
You'll get the .zip file - upload it on the iBuildApp.com server when publishing your Extension Feature.